
Welcome to the first part of MVC in Unity with Scriptable Objects. I’ll make this part Scriptable Objects only and it will remain plain and simple.
First, hear from unity:
A class you can derive from if you want to create objects that don’t need to be attached to game objects.
This is most useful for assets which are only meant to store data.
Then we should ask.
why?
Scriptable Objects native to unity. It has built-in features to use in the editor.
I like the way you use the unity editor in the development cycle. You could make your own editor tools and default editor tools easy enough to configure. With Scriptable Objects, you could carry it further, make your custom data assets and use it in editor or use as a data container.
The image shown above is a sample usage of a Scriptable Object in unity. A single .asset file created in project file can responsible to carry info to many other system in the game and it persists. There is a great presentation about SO on youtube if you’d like to get more (its name Overthrowing the MonoBehaviour Tyranny in a Glorious Scriptable Object Revolution :)) about this.

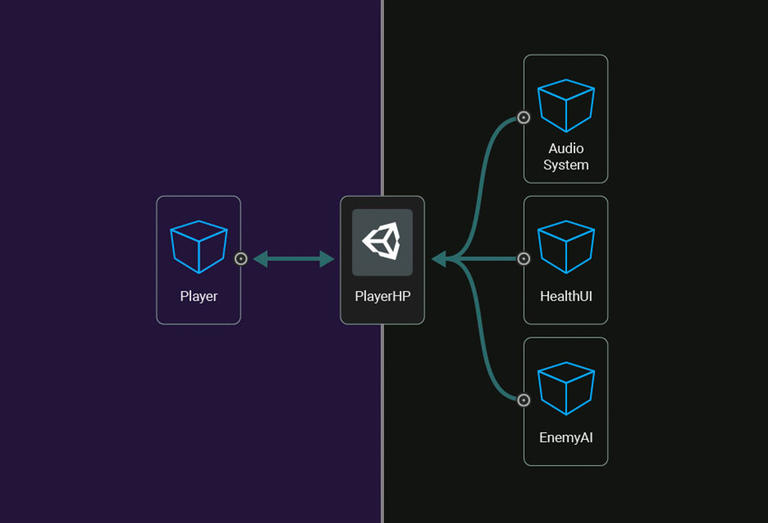
Another great sample is shown above. Here other MonoBehaviour objects have a reference on Inventory object and Save System has them all. This image is from another great talk, Game Architecture with Scriptable Objects, I highly recommend to check out his approach.
Another awesomeness to add is you wouldn’t want to use over .json or .xml to over SO once you understand it features. This makes it perfect for a configuration mechanism in unity.
So let’s use it in an action.
using UnityEngine;

public class ItemData : ScriptableObject
{
    public string itemName;
    public ItemType type;
    public float attack;
}

public enum ItemType
{
    Dagger,
    Axe,
    Sword,
    Staff
}
We have created a class named ItemData and some attributes like in rpg games. We’ll make some item in project folder and access them from a script to display on console. But before that, we have add a crucial ingredient to our ItemData class.
using UnityEngine;

[CreateAssetMenu]
public class ItemData : ScriptableObject
{
    public string itemName;
    public ItemType type;
    public float attack;
}

public enum ItemType
{
    Dagger,
    Axe,
    Sword,
    Staff
}
CreateAssetMenu attribute is we have added on ItemData class is specifying to unity that we want to create a file in project folder from this SO class, otherwise, you can’t create .asset file from the editor with right-click or use create button in the project folder.


Let’s create a folder named Items and try to create an ItemData in the project folder.

I’ll make another script to hold these data files named Inventory.
using UnityEngine;

public class Inventory : MonoBehaviour
{
    public ItemData[] inventory;
}
Add a method to display item info on console and length control to inventory.
using UnityEngine;

public class Inventory : MonoBehaviour
{
    public ItemData[] inventory;

    int index = 0;

    public void NextItemInfo()
    {
        if (index > inventory.Length)
        {
            index = 0;
        }

        Debug.Log("Item name: " + inventory[index].name);
        Debug.Log ("Attack power: " + inventory[index].attack);

        switch(inventory[index].type)
        {
            case ItemType.Axe:
            Debug.Log("Item type: Axe");
            break;

            case ItemType.Dagger:
            Debug.Log("Item type: Dagger");
            break;

            case ItemType.Staff:
            Debug.Log("Item type: Staff");
            break;

            case ItemType.Sword:
            Debug.Log("Item type: Sword");
            break;
        }

        index ++;
    }

}
I’ll use the space bar to use our method. It very easy makes it with unity. In Update we’ll check if our key pressed, thanks to Input class.
using UnityEngine;

public class Inventory : MonoBehaviour
{
    public ItemData[] inventory;

    int index = 0;

    private void Update()
    {
        if (Input.GetKeyDown(KeyCode.Space))
        {
            NextItemInfo();
        }
    }

    public void NextItemInfo()
    {
        if (index > inventory.Length)
        {
            index = 0;
        }

        Debug.Log("Item name: " + inventory[index].name);
        Debug.Log ("Attack power: " + inventory[index].attack);

        switch(inventory[index].type)
        {
            case ItemType.Axe:
            Debug.Log("Item type: Axe");
            break;

            case ItemType.Dagger:
            Debug.Log("Item type: Dagger");
            break;

            case ItemType.Staff:
            Debug.Log("Item type: Staff");
            break;

            case ItemType.Sword:
            Debug.Log("Item type: Sword");
            break;
        }

        index ++;
    }

}
Now, It’s time to switch back to unity editor. We’ll populate our inventory array with our ItemData files that we have created in Items folder. But first, let’s create an empty object in the scene and attach our Inventory script.

Let’s give it a go. Hit play to test it.

It’s working! Now I want to want to show you that you could not only carry variables in SO, but we’ll also add a method to calculate the price for us in ItemData . Look up in docs to more in here and here.
using UnityEngine;

[CreateAssetMenu]
public class ItemData : ScriptableObject
{
    public string itemName;
    public ItemType type;
    public float attack;

    public float GetPrice()
    {
        return attack * 40;
    }
}
Then in Inventory let’s use our new method :
using UnityEngine;

public class Inventory : MonoBehaviour
{
    public ItemData[] inventory;

    int index = 0;

    private void Update()
    {
        if (Input.GetKeyDown(KeyCode.Space))
        {
            NextItemInfo();
        }
    }

    public void NextItemInfo()
    {
        if (index == inventory.Length)
        {
            index = 0;
        }

        Debug.Log("Item name: " + inventory[index].name);
        Debug.Log ("Attack power: " + inventory[index].attack);

        switch(inventory[index].type)
        {
            case ItemType.Axe:
            Debug.Log("Item type: Axe");
            break;

            case ItemType.Dagger:
            Debug.Log("Item type: Dagger");
            break;

            case ItemType.Staff:
            Debug.Log("Item type: Staff");
            break;

            case ItemType.Sword:
            Debug.Log("Item type: Sword");
            break;
        }
        Debug.Log("Item price: " + inventory[index].GetPrice());

        index ++;
    }

}
Now hit the play to see the result.

Check out unity project on github!
This was the end of our first part. Next part we’ll introduce the MVC in unity. But since we are familiar with the SO, we’ll add some SO spice to make it more robust and this is how unity ninja’s do 😎👾